目录
上帝说,要把HTML,JS,CSS分开,让他们各司其职,共同完成前端工作。
然后,Gradio把它们都改了回去。
Gradio能够允许你使用Python一键启动一个APP的前端,方便与后端进行数据交互,被广泛地用于人工智能模型的面板。
注意:本文假设你已经具备基础的Gradio知识。如果没有,请阅读:Gradio手册 - 快速上手
列与列之间的布局
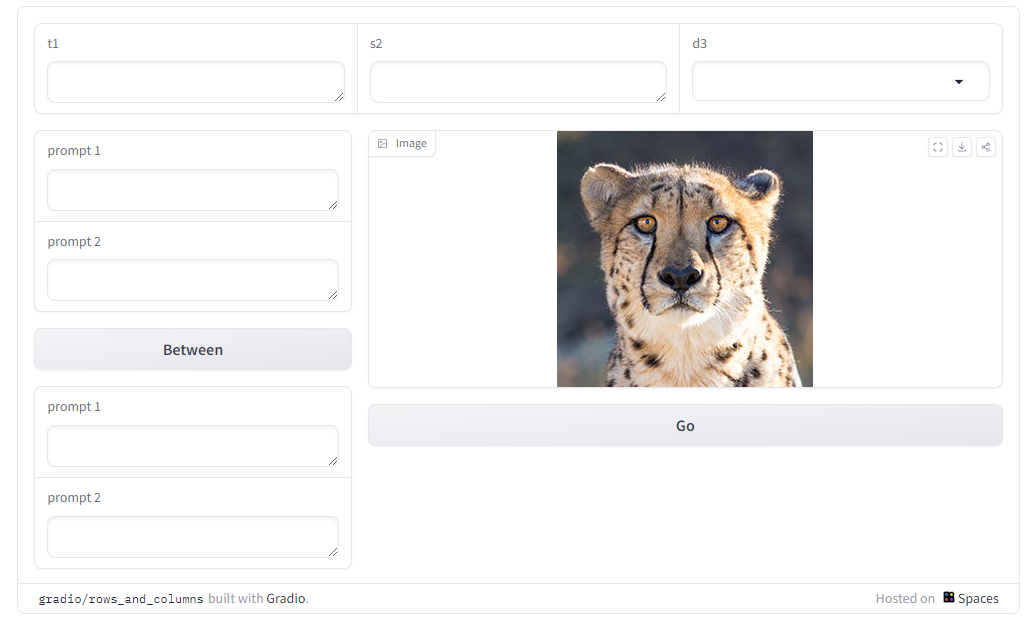
Gradio和Umi等库类似,提供了非常好用的布局机制,你只需要使用Row和Column即可快速构建一个行列元素的网页:
Pythonimport gradio as gr

with gr.Blocks() as demo:
    with gr.Row():
        text1 = gr.Textbox(label="t1")
        slider2 = gr.Textbox(label="s2")
        drop3 = gr.Dropdown(["a", "b", "c"], label="d3")
    with gr.Row():
        with gr.Column(scale=1, min_width=300):
            text1 = gr.Textbox(label="prompt 1")
            text2 = gr.Textbox(label="prompt 2")
            inbtw = gr.Button("Between")
            text4 = gr.Textbox(label="prompt 1")
            text5 = gr.Textbox(label="prompt 2")
        with gr.Column(scale=2, min_width=300):
            img1 = gr.Image("images/cheetah.jpg")
            btn = gr.Button("Go")

demo.launch()

这很好,但是实际使用时,会发现这个行列机制非常令人恼火。最重要的原因是,它具有一个min_width机制:
- 当页面缩放时,它会对
min_width与100%进行判定,并取最大值
换句话说,只要你规定了min_width,这个元素的最小宽度不会小于它,而其他的列如果一行占不下,就会自动换行到下一行。这本是一个非常利于布局的设计,但是对于gr.Column来说简直是灾难,因为它把min_width设置到了300。也就是说,无论你这一列里的东西有多简单、有多窄,它都会给你留出300的空间。
假如我有如下代码:
Pythonwith gr.Row(equal_height=True):
    with gr.Column(scale=10):
        prompt = gr.Textbox(label="prompt")
        negative_prompt = gr.Textbox(label="negative_prompt")
    with gr.Column(scale=1, elem_classes="prompt-opt-group"):
        color_btn = gr.Button("🎨")
        undo_btn = gr.Button("◀️")
        save_btn = gr.Button("💾")
        note_btn = gr.Button("🗒️")
    with gr.Column(scale=1):
        generate_btn = gr.Button("Generate", scale=1)
        with gr.Row():
            style_drop_1 = gr.Dropdown(style_1, label="style 1", value=f"{style_1[0]}", interactive=True)
            style_drop_2 = gr.Dropdown(style_2, label="style 2", value=f"{style_2[0]}", interactive=True)
css.prompt-opt-group button {
    width: 40px;
    height: 40px;
}
按照官方给的文档,scale负责规定缩放程度,这样的缩放最终的结果应当是10:1:1的布局。然而,实际上展示给你的样子是这样的:

因为系统规定了Column的最小宽度是300,因此你会得到一大片留白。所以在进行缩放时,要手动指定最小宽度,以得到想要的效果:
Pythonwith gr.Row(equal_height=True):
    with gr.Column(scale=20):
        prompt = gr.Textbox(label="prompt")
        negative_prompt = gr.Textbox(label="negative_prompt")
    with gr.Column(scale=1, min_width=0, elem_classes="prompt-opt-group"):
        color_btn = gr.Button("🎨")
        undo_btn = gr.Button("◀️")
        save_btn = gr.Button("💾")
        note_btn = gr.Button("🗒️")
    with gr.Column(scale=8, min_width=250):
        generate_btn = gr.Button("Generate", scale=1)
        with gr.Row():
            style_drop_1 = gr.Dropdown(style_1, label="style 1", value=f"{style_1[0]}", interactive=True)
            style_drop_2 = gr.Dropdown(style_2, label="style 2", value=f"{style_2[0]}", interactive=True)

我认为这不是一个好设计,大部分情况下,开发者需要对不同的元素分配不同的宽度,而300这个最小值明显偏大了,导致很容易出现布局出问题的情况。
注意:
- 你可能注意到了style从列布局变成了行布局,原因是它们本该是行,但是在修改前,操作按钮占据了太多的宽度,导致了它被Gradio自动处理了换行。
导入CSS文件
Gradio为了降低使用门槛,封装了太多的东西,这也导致了很多基本的东西无法使用。
例如,我如果想修改一个按钮的样式,该怎么做?
Gradio提供了内联样式的使用方法,但是这未免有点过于抽象了,将CSS写进js文件就很容易造成人的困惑和后期维护困难,更不要提Gradio相当于把HTML,CSS,JS混在了一起写。
我的建议是直接创建一个CSS文件。例如,我在main.py的目录下创建一个style.css。它的内容是:
css.ckpt_row {
    max-width: 40%;
}
之后,直接使用open把这个文件打开并存入变量中:
Pythonwith open('style.css', 'r', encoding='utf-8') as file:
    cssfile = file.read()
这个时候我们就得到了一个变量cssfile,它代表了style.css的所有内容。接下来我们只需要将其导入:
Pythonimport gradio as gr

with open('style.css', 'r', encoding='utf-8') as file:
    css = file.read()

checkpoints = [
    "sd-v1-5-pruned-ema.ckpt",
    "fg-v2-4-venv-create.ckpt",
]


with gr.Blocks(css=cssfile) as demo:
    with gr.Row(elem_classes="ckpt_row"):
        ckpt_choice = gr.Dropdown(checkpoints, label="Checkpoints")


if __name__ == "__main__":
    demo.launch()
我们使用参数css,即可将css文件导入进Gradio,之后有两种方式应用:
- 使用
elem_classes参数,这相当于规定了这个元素的class - 使用
elem_id参数,这相当于规定了这个元素的id
这样,我们就可以像写前端一样,将css与其它代码分离出去,专注于其他内容的编写,而不用将注意力在布局和功能上来回切换。
模块化代码应用:Tab页面切换
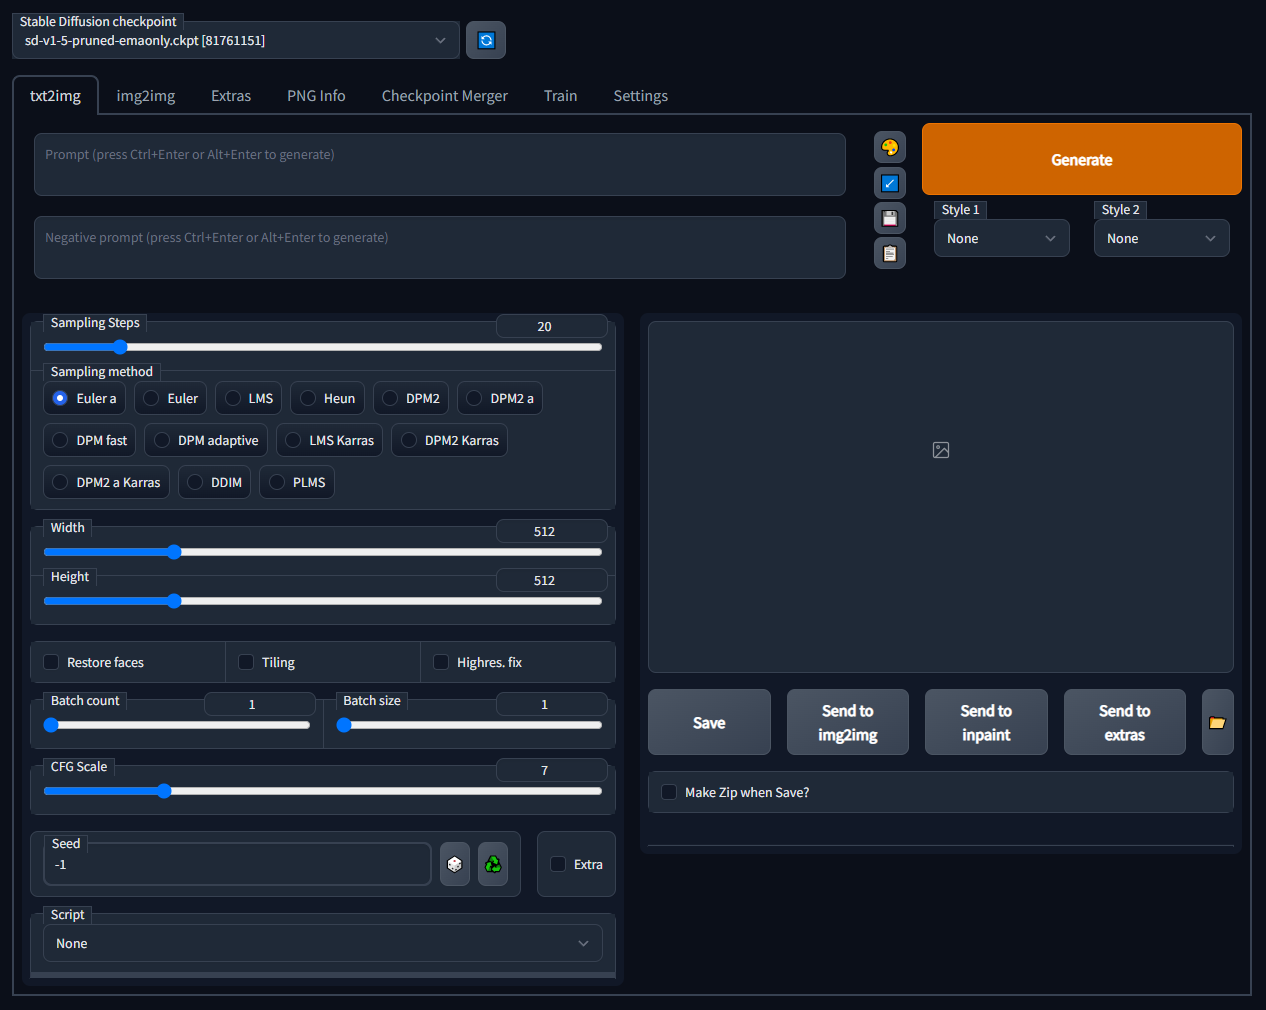
Gradio构建的一般是单页应用,但是我们有时需要多个Tab来进行页面切换,例如下面的Stable Diffusion的Web UI,就包含了很多Tab。

将这么多Tab写进一个main.py肯定是非常费劲的,那么我们就可以将这部分代码分离出来单独写,最后再import回main.py。
Pythonimport gradio as gr
from src.txt2img import txt2img
from src.img2img import img2img

with open('style.css', 'r', encoding='utf-8') as file:
    css = file.read()

checkpoints = [
    "sd-v1-5-pruned-ema.ckpt",
    "fg-v2-4-venv-create.ckpt",
    "hj-v3-3-csv-public.ckpt",
    "io-v4-2-main-set.ckpt",
    "ta-v5-1-flag-share.ckpt",
]


with gr.Blocks(css=css) as demo:
    with gr.Row(elem_classes="ckpt_row"):
        ckpt_choice = gr.Dropdown(checkpoints, label="Checkpoints")
    with gr.Row():
        with gr.Tabs():
            txt2img()
            img2img()


if __name__ == "__main__":
    demo.launch()
我们就这样创建了一个页面,它包含了两个Tab,代码则是分别书写在不同的文件里的。
来看看src/img2img.py:
Pythonimport gradio as gr

style_1 = [
    "None",
    "style-1-1",
    "style-1-2",
    "style-1-3",
    "style-1-4",
]

style_2 = [
    "None",
    "style-2-1",
    "style-2-2",
    "style-2-3",
    "style-2-4",
]


def img2img():
    with gr.Tab("img2img"):
        with gr.Row(equal_height=True):
            with gr.Column(scale=20):
                prompt = gr.Textbox(label="prompt")
                negative_prompt = gr.Textbox(label="negative_prompt")
            with gr.Column(scale=1, min_width=0, elem_classes="prompt-opt-group"):
                color_btn = gr.Button("🎨")
                undo_btn = gr.Button("◀️")
                save_btn = gr.Button("💾")
                note_btn = gr.Button("🗒️")
            with gr.Column(scale=8, min_width=250):
                generate_btn = gr.Button("Generate", scale=1)
                with gr.Row():
                    style_drop_1 = gr.Dropdown(style_1, label="style 1", value=f"{style_1[0]}", interactive=True)
                    style_drop_2 = gr.Dropdown(style_2, label="style 2", value=f"{style_2[0]}", interactive=True)
实际上就是把内容直接写进去就好,非常的简便,同时也利于页面后期的维护。
本文作者:Jeff Wu
本文链接:
版权声明:本博客所有文章除特别声明外,均采用 BY-NC-SA 许可协议。转载请注明出处!